

If you’re looking to brighten up your breakfast, brunch, or even lunchtime routine, Easy Cheddar Waffle Sandwiches are a game-changer. These golden, crispy waffles with gooey cheddar tucked between layers bring together savory satisfaction and nostalgic comfort. Whether you’re feeding a crowd or simply want a quick meal that feels special, this simple recipe will have everyone coming back for seconds.
Why You Will Love This Recipe
First and foremost, who doesn’t adore melty cheese and crispy edges in a warm sandwich? Not only are these cheddar waffle sandwiches unbelievably easy to make, but you can also tailor them to your own tastes. You can add fresh herbs, toss in your choice of veggies, or even add cooked bacon for an extra twist. Plus, they’re perfect for meal prep, lunchboxes, or a cozy brunch with friends. Because the recipe is so versatile and approachable, both novice cooks and seasoned home chefs can whip up this dish in no time.
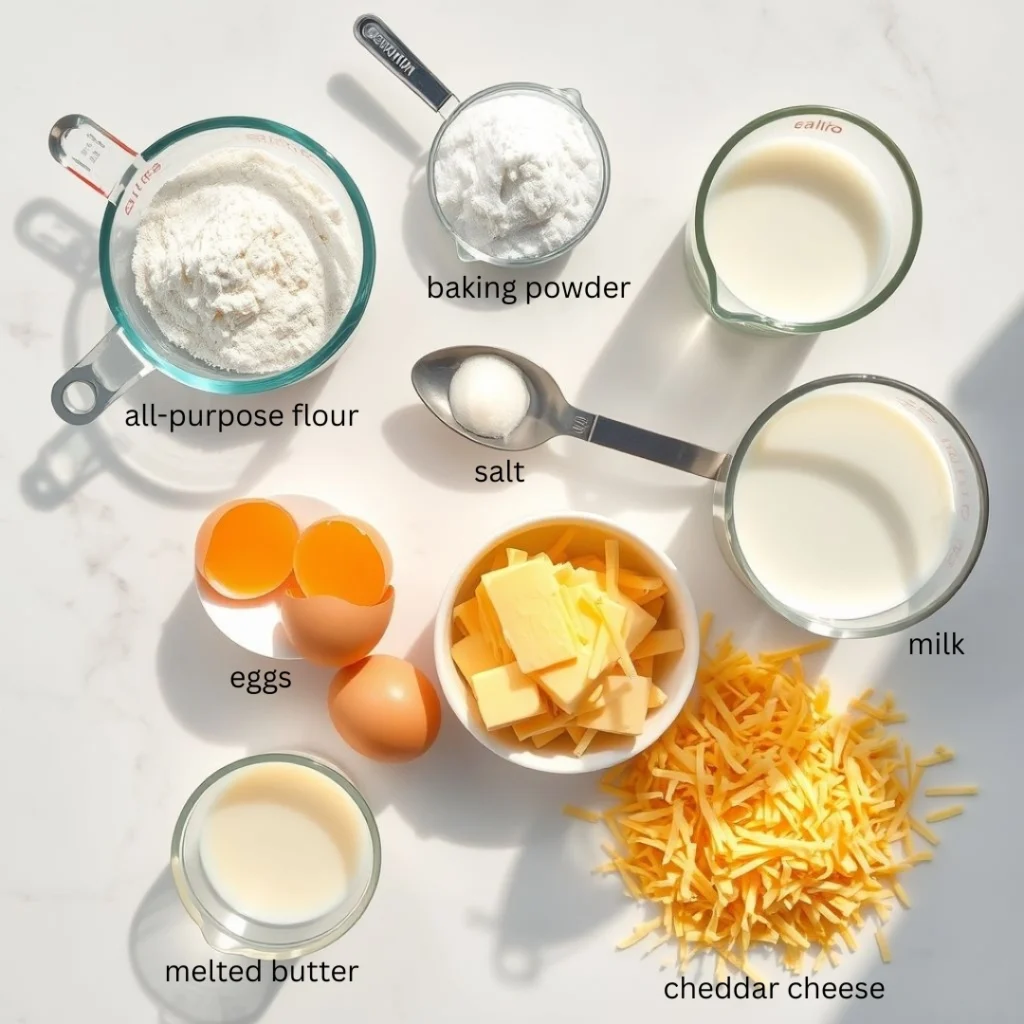
Ingredients
- 2 cups all-purpose flour
- 2 teaspoons baking powder
- ½ teaspoon baking soda
- 1 teaspoon salt
- 1 teaspoon sugar
- 2 large eggs
- 1 ¾ cups milk (whole or 2%)
- ¼ cup melted butter (plus extra for waffle iron)
- 1 ½ cups shredded sharp cheddar cheese
- Optional: Fresh chives, diced jalapeño, crumbled cooked bacon, or sliced tomatoes for garnish
How to Make (Step-by-Step)
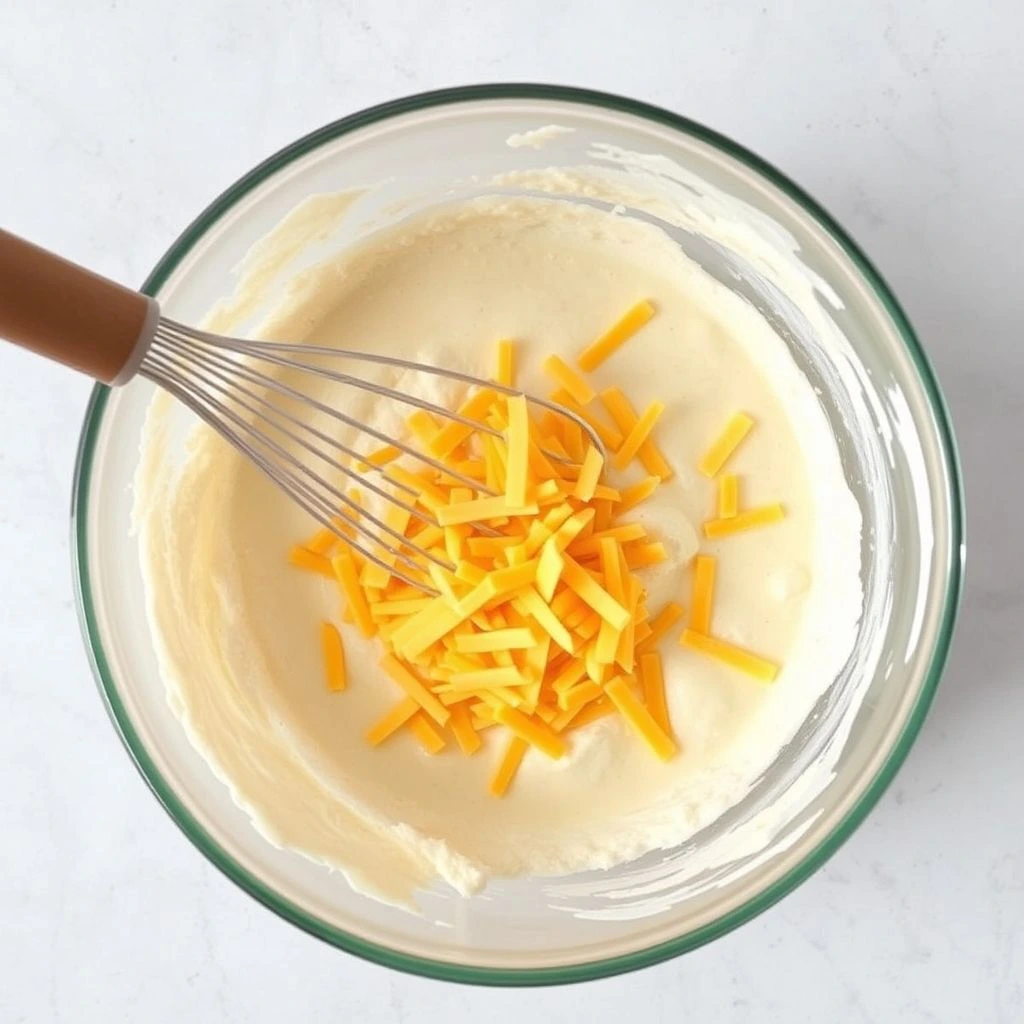
Step 1: Prepare Your Waffle Batter
Start by whisking together the flour, baking powder, baking soda, salt, and sugar in a large bowl. Next, in a separate bowl, beat the eggs and then pour in the milk and melted butter. After that, add the wet ingredients to the dry mixture and stir just until combined. For the best result, do not overmix as this may make the waffles tough. Now, gently fold in your shredded cheddar and any optional flavorings you’ve chosen.
Step 2: Preheat and Grease Your Waffle Iron
Because sticking waffles can be a mess, it’s important to preheat your waffle iron to 375°F (190°C) and brush it lightly with butter. Doing this not only ensures crispy edges but also makes removing the finished waffles so much easier.
Step 3: Cook the Waffles
Spoon an appropriate amount of batter into your hot waffle iron, being careful not to overfill. Close the iron and let the waffles cook for 4–6 minutes, or until they’re golden brown with crispy edges. Once they’re perfectly cooked, carefully remove each waffle and let them rest for a couple of minutes.
Step 4: Build the Sandwiches
To assemble, all you need to do is layer one cheddar waffle with your choice of extra fillings (such as fresh greens, a tomato slice, or even more cheese), then top with another waffle. Because the filling is customizable, you can adapt each sandwich to suit everyone at the table.
Expert Tips
- Always let your batter rest for about 5 minutes so the leavening agents can activate, making your waffles lighter and fluffier.
- Don’t skimp on preheating or greasing your waffle iron; this is a must for both crispiness and easy clean-up.
- For an extra flavor kick, try adding a pinch of smoked paprika or a handful of chopped scallions to your batter.
- If you like even crispier waffles, leave them in the iron for an extra 1–2 minutes.
Recipe Variations
- Spicy Cheddar Waffles: Add diced jalapeños or a dash of hot sauce for some heat.
- Herb Waffles: Fold in fresh herbs like chives, parsley, or even rosemary for a savory boost.
- Meaty Waffle Sandwiches: Layer with cooked bacon, ham, or turkey for a protein-packed meal.
- Classic Breakfast: Top with a fried egg and your favorite breakfast meat for an indulgent brunch.
- Sweet & Savory: Drizzle a touch of honey or maple syrup on your sandwich for a surprisingly delicious twist.
Storage and Reheating
If you have leftovers (which is rare in my house!), you can store the waffles in an airtight container in the refrigerator for up to 3 days. To prevent them from getting soggy, place parchment paper between each waffle. For longer storage, waffles freeze beautifully; simply wrap each waffle in plastic, then foil, and freeze for up to 2 months. To reheat, just pop them in a toaster or oven at 350°F (175°C) for about 5–6 minutes. This will help maintain their crispiness.
Serving Suggestions
Because these cheddar waffle sandwiches are so filling and flavorful, you can serve them with a simple green salad, fresh fruit, or even a cup of tomato soup. For a breakfast spread, try pairing them with crispy hash browns and a fruit parfait. To make brunch extra special, offer a toppings bar with pickles, avocado slices, and spicy mustard for dipping.

Easy Cheddar Waffle Sandwiches
Description
If you’re looking to brighten up your breakfast, brunch, or even lunchtime routine, Easy Cheddar Waffle Sandwiches are a game-changer. These golden, crispy waffles with gooey cheddar tucked between layers bring together savory satisfaction and nostalgic comfort. Whether you’re feeding a crowd or simply want a quick meal that feels special, this simple recipe will have everyone coming back for seconds.
Ingredients


Instructions
Step-by-Step
-
Step 1: Prepare Your Waffle Batter
Start by whisking together the flour, baking powder, baking soda, salt, and sugar in a large bowl. Next, in a separate bowl, beat the eggs and then pour in the milk and melted butter. After that, add the wet ingredients to the dry mixture and stir just until combined. For the best result, do not overmix as this may make the waffles tough. Now, gently fold in your shredded cheddar and any optional flavorings you’ve chosen.
-
Step 2: Preheat and Grease Your Waffle Iron
Because sticking waffles can be a mess, it’s important to preheat your waffle iron to 375°F (190°C) and brush it lightly with butter. Doing this not only ensures crispy edges but also makes removing the finished waffles so much easier.
-
Step 3: Cook the Waffles
Spoon an appropriate amount of batter into your hot waffle iron, being careful not to overfill. Close the iron and let the waffles cook for 4–6 minutes, or until they’re golden brown with crispy edges. Once they’re perfectly cooked, carefully remove each waffle and let them rest for a couple of minutes.

-
Step 4: Build the Sandwiches
To assemble, all you need to do is layer one cheddar waffle with your choice of extra fillings (such as fresh greens, a tomato slice, or even more cheese), then top with another waffle. Because the filling is customizable, you can adapt each sandwich to suit everyone at the table.

Nutrition Facts
Servings 4
- Amount Per Serving
- Calories 350kcal
- % Daily Value *
- Total Fat 18g28%
- Saturated Fat 9g45%
- Cholesterol 90mg30%
- Total Carbohydrate 32g11%
- Dietary Fiber 1g4%
- Sugars 4g
- Protein 14g29%
- Vitamin A 220 mg
- Calcium 280 mg
- Iron 2 mg
- Vitamin D 1 mg
* Percent Daily Values are based on a 2,000 calorie diet. Your daily value may be higher or lower depending on your calorie needs.
Note
Always remember, if you’re cooking for kids or picky eaters, you can sneak in finely chopped vegetables like spinach or bell peppers. If you’re worried about too much fat, reduce the cheese slightly or use a reduced-fat version. Don’t be afraid to experiment with different cheese blends—mozzarella and sharp cheddar together are especially delightful!